Recently, while learning about available device for distance measurement/detection, I got to test out the LIDAR-Lite v3HP by Garmin.

This is actually the rugged version of the LIDAR-Lite v3 which is lower in cost.

These lidars are small, lightweight and not super expensive (compare to other higher cost lidars in the market). They are ideal in several robotics applications that assist with object detection or avoidance like drone and mobile robots. In this post, I’ll cover how to read this sensor through standard I2C wiring in both Arduino and Jetson Nano (should be applicable to Raspberry Pi as well).
Arduino
1. Wiring
Here is the wiring diagram snapshot that I took from Lidar Lite v3 Manual
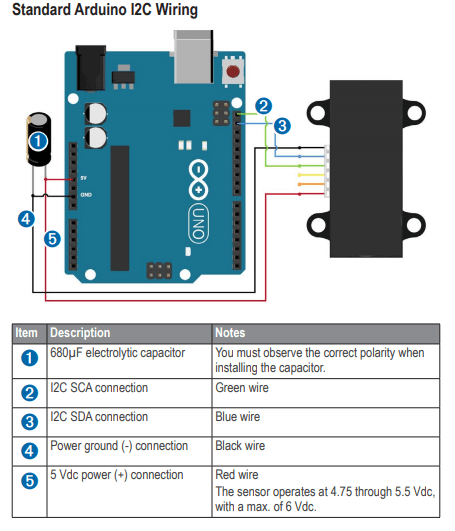
Note: You can also use a 1000 uF electrolytic compacitor instead of 680 uF.
2. Firmware
This part is easy because Garmin provides an Arduino library to read the device. https://github.com/garmin/LIDARLite_Arduino_Library. You can also install the library directly from your Arduino IDE’s Libary Manager:
Arduino IDE > Tools > Include Library > Manage Library > search for “lidar” > Install LIDAR-Lite by Garmin from the list
3. Testing with example script
After install, close and reopen Arduino IDE, then File > Examples > LIDAR-Lite > Choose the example script you want to upload to your device. Here I have Lidar-Lite v3HP, so I choose the v3HP_I2C script.
The example script actually has a different range of range reading option that user can choose. Something like this if the script has:
Serial.println("=====================================");
Serial.println("== Type a single character command ==");
Serial.println("=====================================");
Serial.println(" S - Single Measurement");
Serial.println(" C - Continuous Measurement");
Serial.println(" T - Timed Measurement");
Serial.println(" . - Stop Measurement");
Serial.println(" D - Dump Correlation Record");
Use the Serial Monitor to send command (letter) to the Arduino through serial.
Jetson Nano
1. Wiring
Diagram for J21 pinout on Jetson Nano by Adafruit

I use pin 3,4,5,6 to connect with the LIDAR-Lite. To be safe, power-off all devices when you connect the wire.
After finish, boot up the Jetson Nano, check if the device is connected with:
sudo i2cdetect -y -r 1
If Lidar is connected, you should see address 0x62 showing up after the scan.
2. Library
Garmin also provides a C++ library to read the Lidar-Lite V3 by Raspberry Pi. I tried it out for Jetson Nano on the Lidar-Lite V3HP, and it also works.
To try the library with provided example
git clone https://github.com/garmin/LIDARLite_RaspberryPi_Library.git
cd LIDARLite_RaspberryPi_Library
make
cd bin
sudo ./llv3.out
******
Disclosure: The provided product links are affiliated links. As an Amazon Associate I earn a small commission from qualifying purchases.
