Welcome to another post on CAN hardware. As the title suggests, it’s Teensy + CANbus time.
Required Hardware
Teensy. I use Teensy 3.2 board

CAN transceiver. I use this Waveshare Transceiver

Jumper wires (optional)
Intro
Teensy 3.2 comes with 1 CAN port, and Teensy 3.6 comes with 2. To know where they are, you can read the Pinout diagram provided by PJRC in here for example: https://www.pjrc.com/teensy/teensy31.html
However, the CAN port comes in the Teensy is not complete to use right out of the box for both sending and receiving (read more here). We need an extra component to allow CAN sending from Teensy, that’s a CAN transceiver. If you also read the How to enable CAN bus on Jetson TX2 before, this is basically the same case. In this post, I am also using the same transceiver.
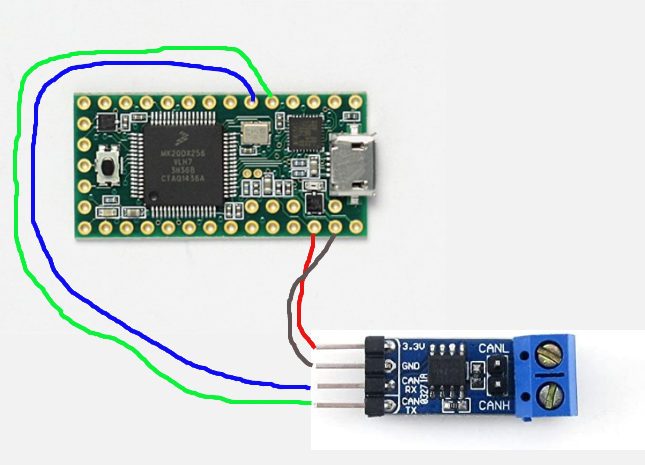
Wiring
Teensy 3.2 < — > Waveshare Transceiver
Pin3 < — > TX
Pin 4 < — > RX
GND < — > GND
3.3V < — > 3.3 V
Connect to DB9 Connector (Optional)
This step is totally optional. Canbus would just work if you join the CAN-H and CAN-L from the transceiver to your device. If you use a CAN device such as Kvaser USB CAN to talk to Teensy, including a DB9 female connector for Teensy is more convenient to connect.
On the DB9 female, pin 2 is for CAN-L and pin 7 is for CAN-H. You can refer to this page for picture of the pin (http://www.can232.com/can232/products.htm).
I also have a terminal resistor (120ohm) bridge between CAN-H & CAN-L wire. This is neccessary for high speed CAN bus.
Software
If this is your first time setting up Teensy, make sure you have the environment set up. You can see the information here.
Teensy Duino comes with FlexCAN library. Specifically, the fork by Collin Kidder https://github.com/collin80/FlexCAN_Library
Example script is located in the library folder.
(for ex: /home/user/arduino-1.8.13/hardware/teensy/avr/libraries/FlexCAN/examples)
Other note on FlexCAN library
Collin’s FlexCAN version is a modification of the original FlexCAN repos from here and here. If you use example codes that may refer to the other two author’s FlexCAN libraries, chance is your board CAN bus not going to work with built-in FlexCAN. The sample code needs to point to the correct library.
However, if you like to use another FlexCAN version instead, you need to remove the built-in version first. Otherwise, the IDE will just keep pulling from the default library.
To remove the default FlexCAN:
- Locate FlexCAN library in your installed Arduino folder.
- For example, I have /home/user/arduino-1.8.9/hardware/teensy/arv/libraries
- Remove this FlexCAN folder from here, or just copy it elsewhere if you want to go back to it.
- Then you can put the FlexCAN library that you want to use here.
More common problems on FlexCAN library can be referred to this forum thread
https://forum.pjrc.com/threads/39867-Another-fork-of-FlexCAN
***
Disclosure: The provided product links are affiliated links. As an Amazon Associate I earn a small commission from qualifying purchases.
Was the content useful?You can support author with Buy me a Coffee
