I have been waiting for a small form factor industry grade Arduino board for awhile. Looks like there is finally one released in 2020 – the Arduino Portenta H7. Today I got the chance to try this board for some potential applications. The goals of this post are initial setup to upload codes, blinking test and echo UDP message.
Components I use in this post:
Arduino Portenta H7


USB-C Cable – like other Arduino boards, they don’t come with cable. The Portenta H7 uses USB-C type.
The Portenta itself is a small form factor with limited number of pins that are suitable for general I/O purposes. I want to use this board to communicate through Ethernet eventually, so I use the breakout board to test out the Ethernet application. The Portenta can connect with the breakout board through the 80 pin high-density connectors. You may need to apply a bit of force to snap the connectors together. The connection seems solid once they are attached.


Setup Environment
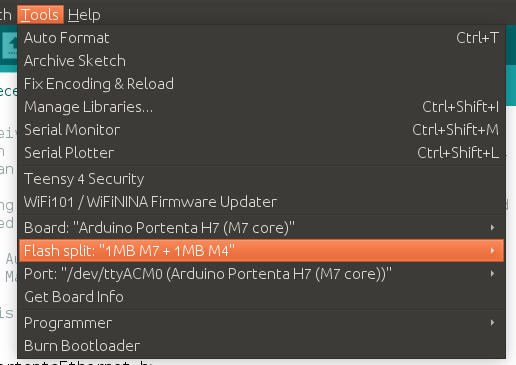
I followed the Quick Guide from Arduino website. My first pick is the stable Arduino IDE 1.8 because this is what I already have on my machine. When everything is setup correctly, I can see the board and port to select as below.
***Upload issue***:
I ran into dfu-util issue as below when trying to upload with Arduino IDE without sudo privilege. Then I tried Arduino IDE 2.0 as well, and there is still same issue.

After googling for awhile, I found the easiest hack to over come this is to use sudo privilege according to this post. However, I do not want to save my code in the Arduino IDE with sudo privilege. Because this will overwrite your file permission as “root”, and I want to preserve the user permission for my codes. So except compile and upload through Arduino IDE under sudo privilege, I make local changes with Visual Studio Code. There is an Arduino extension in VSCode can be installed to program Arduino .ino files.
***New Update***, I found a further fix for the issue above
First, update the Bootloader, my board comes with Bootloader version 21. I update to version 22. You can use sudo hack method above to do this.
Then follow Arduino’s trouble shooting guide to add USB rule. But mine still didn’t work after doing what they suggest, this rule works for me. My 20-portenta.rules file looks like the suggestion here.
SUBSYSTEMS=="usb", ATTRS{idVendor}=="2341", ATTRS{idProduct}=="035b", GROUP="plugdev", MODE="0666"
Usually restart Arduino IDE and recycle power for the Portenta could be enough. If you still can’t upload with the precedent approach, try a restart.
Sample Codes
You can get the copy for all the codes in my repo here.
Blink test:
This example is quite simple, it’s similar with the classic Blink test code. You can get the Blink example code in File > Examples > Built-in Examples > 01. Basics > Blink. This codes need some modification because it is not written for Portenta. See more below.

The Portenta comes with an built-in RGB LED which are not mentioned in the built-in Blink example. Portenta Led pins can be defined with LEDR, LEDG, LEDB. Below is my modified codes, you can copy to your local Blink project.
/*// the setup routine runs once when you press reset:
void setup() {
  // initialize the digital pin as an output.
  pinMode(LEDR, OUTPUT);
  pinMode(LEDG, OUTPUT);
  pinMode(LEDB, OUTPUT);
}

void blink(int led, unsigned long msecs = 1000) {
    digitalWrite(led, LOW);
    delay(msecs);
    digitalWrite(led, HIGH);
    delay(msecs);
}

// the loop routine runs over and over again forever:
void loop() {
    blink(LEDR);
    blink(LEDG);
    blink(LEDB);
}
Ethernet UDP
Similar as Blink example, I’m using File > Examples > Examples for Arduino Portenta H7 (M7 Core) > Ethernet > UDPSendReceiveString .

Again, I’m making some slight modification for this codes because a constant/macro UDP_TX_PACKET_MAX_SIZE being used does not exist in the Portenta Ethernet library. This macro does exist in standard Arduino Ethernet library. You can see the codes below or all codes at this repo.
#include <PortentaEthernet.h>
#include <Ethernet.h>
#include <EthernetUdp.h>

#ifndef UDP_TX_PACKET_MAX_SIZE
  #define UDP_TX_PACKET_MAX_SIZE 48
#endif

// The IP address will be dependent on your local network:
IPAddress ip(192, 168, 1, 177);

unsigned int localPort = 8888;      // local port to listen on

// buffers for receiving and sending data
char packetBuffer[UDP_TX_PACKET_MAX_SIZE];  // buffer to hold incoming packet,
char ReplyBuffer[] = "acknowledged";        // a string to send back

// An EthernetUDP instance to let us send and receive packets over UDP
EthernetUDP Udp;

void setup() {

  // start the Ethernet
  Ethernet.begin(ip);

  // Open serial communications and wait for port to open:
  Serial.begin(9600);
  while (!Serial) {
    ; // wait for serial port to connect. Needed for native USB port only
  }

  // Check for Ethernet hardware present
  if (Ethernet.hardwareStatus() == EthernetNoHardware) {
    Serial.println("Ethernet shield was not found.  Sorry, can't run without hardware. :(");
    while (true) {
      delay(1); // do nothing, no point running without Ethernet hardware
    }
  }
  if (Ethernet.linkStatus() == LinkOFF) {
    Serial.println("Ethernet cable is not connected.");
  }

  // start UDP
  Udp.begin(localPort);
}

void loop() {
  // if there's data available, read a packet
  int packetSize = Udp.parsePacket();
  if (packetSize) {
    Serial.print("Received packet of size ");
    Serial.println(packetSize);
    Serial.print("From ");
    IPAddress remote = Udp.remoteIP();
    for (int i=0; i < 4; i++) {
      Serial.print(remote[i], DEC);
      if (i < 3) {
        Serial.print(".");
      }
    }
    Serial.print(", port ");
    Serial.println(Udp.remotePort());

    // read the packet into packetBufffer
    memset(packetBuffer, 0, sizeof(packetBuffer));
    Udp.read(packetBuffer, UDP_TX_PACKET_MAX_SIZE);
    Serial.println("Contents:");
    Serial.println(packetBuffer);

    // send a reply to the IP address and port that sent us the packet we received
    Udp.beginPacket(Udp.remoteIP(), Udp.remotePort());
    Udp.write(ReplyBuffer);
    Udp.endPacket();
  }
  delay(10);
}
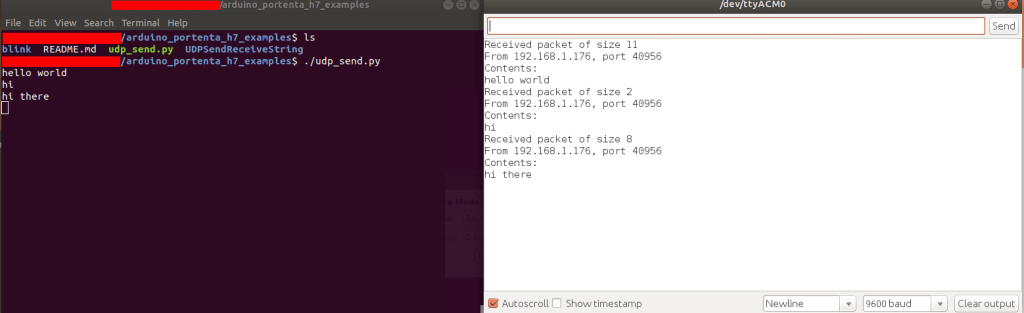
The UDP example above is an echo test. Arduino is set with static ip “192.168.1.177” and bind to port 8888 to listen to data.
// The IP address will be dependent on your local network:
IPAddress ip(192, 168, 1, 177);

unsigned int localPort = 8888;      // local port to listen on
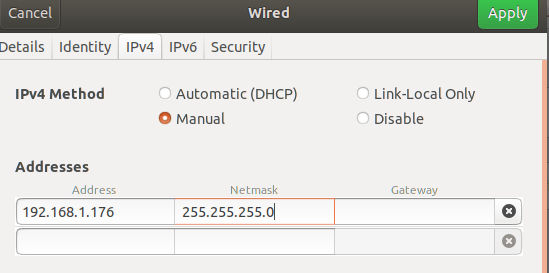
To communicate with Arduino, you should set your IP address to static “192.168.1.xx” as well. X could be arbitrary except 177 (arduino IP). In my Ubuntu 18.04, I set something like this
When there is any data arrived, Arduino prints this information to Serial monitor. I write a simple Python script to act as sender from my PC. If you’re on Windows, you can also use Hercules Setup Utility which is pretty simple to setup UDP connection.
#!/usr/bin/env python3
import socket

def main():
    s = socket.socket(socket.AF_INET, socket.SOCK_DGRAM)
    ip = "192.168.1.177"
    port = 8888

    while True:
        _input = input()
        s.sendto(str.encode(_input), (ip, port))

if __name__ == '__main__':
    main()
Here is the test run
Conclusion
The setup for Portenta is quite straight forward besides the dfu-util permission problem. I could get a couple tests that I want to run successfully. Here I only try out with a single core M7. Portenta comes with 2 cores, and it is advertised to use with machine vision type of application. I will look into some advance usage for this board next.
***
Disclosure: The provided product links are affiliated links. As an Amazon Associate I earn a small commission from qualifying purchases.
Was the content useful?You can support author with Buy me a Coffee

Hi, “First, update the Bootloader,…” this link is a 404 page. I have a “Warning: Invalid DFU suffix signature” on my Arduino 1.8.19 IDE when I try to upload a sketch into my H7. Do you have a solution ? Regards